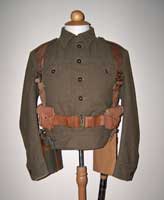
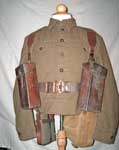
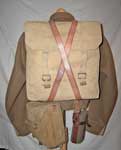
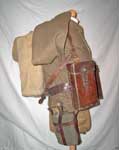
Set with Cartridge carriers
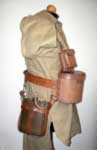
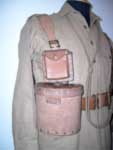
The set illustrated shows the Battle Order for “…personnel other than infantry armed with a rifle…”, for whom Patt. ’37 instructions and Army Form G.1098 scaled only Cartridge carriers, each holding 20 rounds.
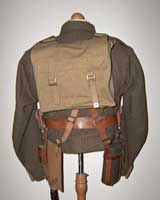
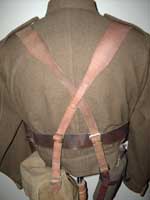
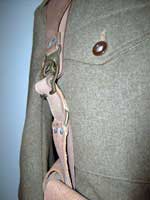
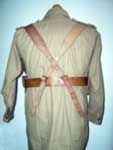
The Pattern 1937 W.E. Haversack was used with Patt. ’39, but fitted to leather shoulder straps. The Carrier for the Implement, intrenching, Patt. 1939, is fitted here on the left. The webbing version is often seen worn on the right in wartime photographs, the water bottle and its Carrier being, theoretically in the front compartment of the Haversack. The Tins, mess, rectangular filled the adjacent front compartment. The rear detail shows the Braces and their unusual crossover loop, uniquely located on the outside of the Brace. The detail at far right shows how the Braces are connected to the Cartridge carriers. From the Chris Pollendine Collection. Photographs © Chris Pollendine, 2010.
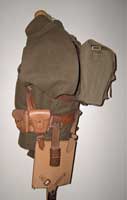
Set with 1st Issue Basic pouches
Here is the Infantry Set in Marching Order, with 1st issue Basic pouches, including the Patt. '08 Haversack and Pack. From the Chris Pollendine Collection. Photographs © Chris Pollendine, 2009.
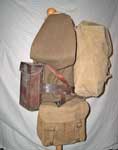
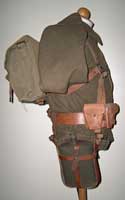
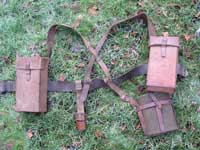
Set with 2nd Issue Basic pouches
These photos illustrate a set with 2nd issue Basic pouches, but without the Intrenching implement carrier or Haversack. Photos courtesy of War Department Militaria, © Paul Laidlaw 2010.

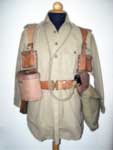
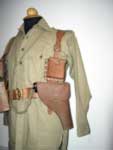
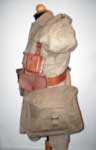
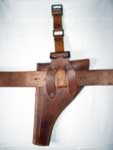
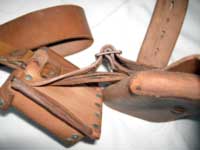
Here is the complete set for officers. See the entry below for the difficulty of actually assembling this equipment! It's also worth noting that this set is shown with two left Braces - that's what Chris had to hand at the time. From the Chris Pollendine Collection. Photographs © Chris Pollendine, 2012.
Assembling the Set for Officers
As we said in the Introduction to the I.E. Pattern 1939 section, this equipment was literally designed over a weekend, and this looks to be one case where that haste shows. Chris P, who we might add, has quite a bit of experience with assembling military equipment, had great difficulty in putting this set together. Here is his discussion of that effort:
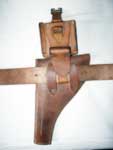
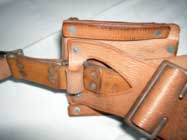
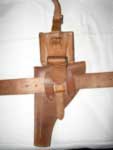
I. E. Pattern 1939 was designed to mirror its web equivalent much more closely than I.E. Pattern 1914 did with W.E. Pattern 1908. Thus, the officers' equipment set consists of the same components as in Pattern 1937, and these are described in the relevant sections. No fitting instructions are currently known of, so we proceed with the premise that it all goes together in the same was as Pattern 1937. However - copying from web to leather brings its own difficulties, by the nature of the differences in the materials - the bulkiness and stiffness in this set was obvious once I started to assemble it. Any officer faced with putting a set together for himself would have had to have chosen his components wisely. I'd like to think the FI's would have addressed the various issues. First, the Belt needs to be just the right size - too big, and you'll have too much slack doubled under, pushing the Holster and Binocular case assemblies under your armpits. Second, the Braces need to be the long size, due to the height of the assemblies, and the amount of winding about they have to do. This, by default, pushes the whole Belt assembly uncomfortably low. In any event, the bino case & compass pouch sit so close together, by design, that it's nigh on impossible to extract the bins without considerable effort. The pattern 39 equipment was designed over a weekend - &it certainly shows with the officer's set..! This series of pictures shows the method of assembling the pistol case & pouch to the belt. The Binocular case and Compass pouch are assembled in the same manner. From the Chris Pollendine Collection. Photographs © Chris Pollendine, 2012.
1. Pass the Brace attachment down through the top fairlead in the Pistol case, to align with the bottom loops. Feed the Belt through the Case loops, picking up the Brace attachment.
2. Feed the top of the Brace attachment under the rear tab of the Pouch, & attach the Pouch tab to the Pistol case.
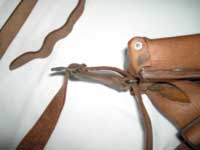
3. Pass the Brace through the top buckle of the Brace attachment, and then through the middle link of same.
4. Pick up the top piece of the rear tab, back through the link, pulling the Brace through to rest between the back of the Pouch and the Brace attachment.
5. The Brace end now finally passes through the top fairlead of the Pistol case, leaving the end free to attach additional components.
Rog Dennis & Chris Pollendine, revised 2012